Blog 1, Laser Cutting
- Axrega Axrega
- Oct 31, 2022
- 8 min read

Updated: Nov 2, 2022
Hello guys, I am Jeevan and this will be my first blog for Chemical Product Design & Development (CPDD). This module is the continuation of the first product design module, ICPD which I had completed in my previous semester. ICPD was alot of fun for me, and I am hoping that CPDD would be as enjoyable. Thus, my class kickstart on this module with the laser cutting practical, which was our competency test in using the laser cutter. Hence, this blog would be mainly on the laser cutter. Stick till the end of the blog to find out more :)
So, in this page, I will describe:
The 4 important hazards associated to the operation of laser cutting machine and their respective safety control measures (administrative/engineering control).
The materials that can be cut and can’t be cut using laser cutting machine.
The steps including pictures on the operation of UNIVERSAL laser cutter, that consist of:
Starting the compressor, turning on the laser cutter machine and fume extractor.
Importing a .DXF file to coreldraw and modify the lines/fill for cutting and engraving.
Sending the coreldraw drawing to laser cutter software and setting the laser cutter power, speed, PPI in the software.
Starting the job on the laser cutter machine.
DOs and DONTs when there’s flame/fire on the material being cut.
My Learning reflection on the laser cutter activities.
1. These are the 4 important hazards and the respective safety control measures on the operation of laser cutting machine:
Hazards | Safety control measures | Pictures to support the explanation |
| Cleaning off debris or dust from the machine If fire is negligible, put it out by blowing If fire is uncontrollable, use fire extinguisher |  |
2. Staring at the laser cutter when it is operating. | Take glances when it is operating instead of staring. |  |
3. Dirty Focus lens due to accumulation of soot can produce dense smoke or fume | Ensure that the fume extractor is turned on. |  |
4. Lifting the lid of the laser cutter immediately | Wait 1 minute for the fume extractor to remove the toxic smell & particles first. |  |
2. Below are the materials that can be cut/engraved using laser cutting machine in FabLab.
Material | Photo of material |
|  |
2. Plywood (Laserply) |  |
3. Cardboard |  |
Below are the materials that can't be cut/engraved using laser cutting machine in Fablab.
Material | Photo of material |
|  |
2. Polyvinyl Chloride (PVC) |  |
3. Polytetrafluoroethylenes (Teflon) |  |
3. Below are the steps on the operation of UNIVERSAL laser cutter machine in FabLab:
a. Starting the compressor, turning on the laser cutting machine and fume extractor.
Steps and description | Photos to support the description |
Switch on the Light switch |  |
Switch on the compressor, fume extractor, and the laser cutting machine |  |
| |
b. Importing a .DXF file to coreldraw and modify the lines/fill for cutting
and engraving.
Steps and description | Photos to support the description |
Import Fusion to Corel Draw (Select File > Import > Select the .DXF File and click "import" |  |
To Vector Cut, change the pen outline color to RGB Red, while keeping the Line Width as Hair line. |  |
To Vector Engrave, change the pen outline color to RGB Green, while keeping the Line Width as Hair line. |  |
To Engrave, change the fill color to RGB Green, and change the Line Width to "None" |  |
Once the appropriate settings have been chosen, click on File > Print |  |
c. Sending the coreldraw drawing to laser cutter software and setting the
laser cutter power, speed, PPI in the software.
Steps and description | Photos to support the description |
Click on the Cogwheel for settings |  |
The Universal's Material setting will appear. Click on LOAD for more material settings |  |
Select the presets that matches the material type and thickness. Then select "Open" |  |
Check the Power: describes the output power of the laser. 100% is maximum power (will cause ugly charring). For dark wood engravings or stamp engravings, you generally need high power, whereas low values are used for materials such as paper. |  |
Check the Speed: describes the movement of the laser head. Fast speeds lead to short exposure times, slow speeds lead to long exposure times. |  |
Check the PPI: Pulses Per Inch, Frequency may also be known as PPI or pulses per inch and is a way to control how many times the laser pulses over a given distance during the cutting process. The higher the frequency the more pulses you have and the more they will overlap resulting in a smoother cut, however the downside to this is that the higher the frequency the more heat it creates while cutting which can cause melting or charring on certain materials | 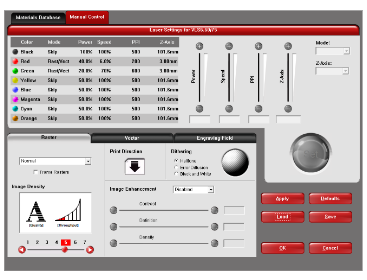 |
Check the Z-Axis: Usually set as the material height for optimal focus point |  |
The dialog may disappear as if nothing has happened. Do not panic, it is running on the Background, simply click on the UCP (Universal Control Panel) icon |  |
d. Starting the job on the laser cutter machine.
Steps and description | Photos to support the description |
Understanding the Control panel 1) Activate/ Deactivate the Laser cutter 2) Play Button to start Cut/ Engraving 3) Pause Button to pause/resume the Cut/Engraving |  |
Here are the four essential tools to learn 1)Zoom – You can also zoom in to the work file using your scroll mouse 2)Focus – This tool will help you check with the help of a Laser dot. It is used to check if your work is within a workable space 3)Move – You can use this tool to move your drawings within the available workspace. Note this is not a live view/action. 4)Estimated time – This will help you determine the estimated time for you to cut/engrave your work |  |
On the UCP, click on the power button to activate the laser cutter on the top right of the control panel. |  |
There is a built-in ruler in the laser cutter, which can be used to identify a small empty space on the plywood. |  |
With the lid still open, click the focus tool and use the crosshair to ensure that the object will be within the safe cutting area, on all 4 corners. |  |
Once the check is complete, click on the estimate Time button and press the Start button to check the timing. Start the cutting process. |  |
Monitor the cutting process by glancing at it but prevent staring at the beam. |  |
Once completed, do not lift the lid immediately. Let the extractor remove the toxic smell and particles first. (Approximately 1 minute) |  |
Remove the cut material and proceed with housekeeping. |  |
Remove any unwanted materials, then deactivate the laser cutter and finally switch off the necessary switches. |  |
e. DOs and DONTs when there’s flame/fire on the material being cut.
DOS and DONTS | Photos to support the description |
DOS: 1) Any flame MUST DIE OUT within 1-2 seconds. If the flame persists, lift the lid of the laser cutter and stop the cutting operation.
2) If the fire is negligible, try putting it out by blowing it off
3) If the fire is unable to blow off,
a. remove material from the laser cutter
b. place it on the floor and step on it to put out the fire
4) If the fire is uncontrollable, go to the closest fire extinguisher and put it out. Get people’s attention by shouting for help.
|   |
DONTS 1. Leave the scene without informing anyone | |
| |
4. Below is my Learning Reflection on the laser cutter activities.
Before my actual tutorial lesson with Mr Chua, I had decided to take it upon myself to go and view the lesson materials on the Brightspace for the upcoming laser cutter tutorial. I managed to look through the materials and I figured a bit about what I was going to learn. It looked very interesting initially, as the thought of laser cutting was new to me. Therefore, I was already excited for the lesson.
On the day of the tutorial session, Mr Chua introduced us about the laser cutter. Specifically, he talked about the CO2 laser cutter machine work, hazards & safety, raster and vector, and finally about kerf. I learnt that there were 2 common CO2 laser cutter that is available in FabLab. It was the Universal Laser Cutter in the Makerspace @ Lib, and the Epilog in T11C. I found out that the Universal Laser Cutter was only able to maintain wattage up to 60W, but the Epilog could maintain from 60-120W.
We were then shown a youtube video, which explained to us on the working principles behind the CO2 laser cutter. Inside of a large glass tube which is namely filled with CO2 and some Nitrogen, high voltage electricity is passed through the tube which excites the gas particles and produces an invisible beam of high powered infrared light (laser beam). This laser beam that is exiting the tube will be immediately bounced onto different mirrors and through a focus lens inside of the nozzle/head which will be ejected onto the working area (object to be cut). I also managed to understand from the video that the thickness and type of material a laser cutter can cut is usually dependent on the power of the laser tube and focus lens. The focus lens will focus the power of the laser beam down into a single point (similar to that of a magnifying glass). The focal point is the point where the power of the laser beam will be its highest. The difference between the focal point and focus lens is known as the focal length, which determines the power of the laser beam. Understanding that the laser cutter uses the principle of light which I have learnt in Secondary School proved to be really useful, as I was able to tap in to my knowledge on magnifying glasses and reflectivity of light. Therefore, it was easy for me to grasp how the laser cutter worked!
The laser cutter can cut through some materials such as wood of up to 6 mm, which consists of plywood, natural wood, MDF. It can also cut Acrylic of up to 5 mm, Cardboard and Paper. Most of these materials it can cut are prone to causing small fires, which I would have to be aware of when handling them. Mr Chua also emphasised that we should not stare into the beam when it is cutting. This is to prevent ourselves from being affected by myopia or any eye related problems. He also instructed us not to use materials which contain chlorine, such as PVC or Foam, and told us to not cut or engrave metals. We should also never leave the machine unattended while it is cutting or engraving, to prevent the possibility of it catching fire. Small fires can be attempted to be extinguished by blowing or removing the material. Having to blow on the small fire does sound scary for myself to do but it is for the safety of everyone. If the material cannot be cut through, stop & check it to see if the focus lens is dirty. If the focus lens is dirty, I should seek assistance for it to be cleaned, as if not, the focus lens could crack from prolonged use when it is dirty.
Next, Mr Chua explained to us about Vector and Raster. Both Vector and Raster are types of graphics which look the exact same from far away, but on closer inspection we can realise that they are very different. Vector graphics consists of anchored dots which are connected by lines and curves, which seemingly provide a more clear and accurate image representation as compared to Raster. Raster on the other hand is made up of pixels, which appear as little squares on graph paper when the image is zoomed into. Both have their own pros and cons and are used for different purposes.
After that, we moved on the CorelDraw software, which was a tool used to draw objects and figures to be cut out using the laser cutter. The main things to know on the CorelDraw software was the changing of the colour of object. For example, for Vector Cut, the colour has to be RGB Red, and the line weight has to be Hairline. However for Vector Engrave, the colour has to be RGB Green and the line weight has to be Hairline. Engrave has to have the colour filled RGB Green. From these characteristics of the laser cutter, I can see that the laser cutter detects the RGB Green colour as "engrave" and RBG Red colour as "cut".
Lastly, we were taught about Kerf. Kerf is simply the excess material that is removed from the object when it is cut by the laser. Kerf will thus cause the cut material to have bigger bigger holes or make its fittings loose, when it is supposed to fit into something of the correct dimensions. Therefore, we have to be aware of Kerf when doing laser cutting as it can cause inaccuracy when doing our laser cutting. Hence, we should cut slightly smaller than the desired dimension, by about 0.1 cm to ensure that the Kerf would not affect the final product.
After being taught all of this important resources that we need, we were ready to take on our laser cutting competency test. However before we can take the test, we actually had to do a FabLab safety quiz, which will then make us eligible to sit for the competency test. This FabLab safety quiz required us to score at least 80% as a passing grade, and it was extremely difficult to complete, I kept on scoring 60% or 70%. Eventually, after paying proper attention to the notes we had on laser cutter, I was able to complete the quiz. Although the quiz was very difficult, it actually helped me to understand some facts about the laser cutter in SP more clearly, such as the differences in dimension of the different laser cutters and the differences in Vector and Raster. With the quiz completed, there was only one more thing for me to complete for me to be eligible to book and do my own laser cutting.
Finally, the laser competency test, which is the most important component of all. I have to use what I have understood about laser cutting from the previous lessons. The thought of having a competency test so quickly did make me nervous, but we were allowed to make our own Standard Operating Procedure (SOP). Using the universal guide provided on Brightspace, I managed to create a detailed SOP on the steps to operate a laser cutter. With the SOP, I sat for the competency test, which I had to complete in a few minutes.
Here was how my competency test went. I first switched on the switches for the compressor and fume extractor, followed by the switch for the laser cutter as according to my SOP. I was tasked to do design 2, which was a circular design. I imported the file from the fusion onto the CorelDraw application and modified the design settings to make it engrave the inner design while cutting the outer piece. I did this using the help of the details of the settings from my SOP, such as RGB Green for the engraving and RGB Red for the cutting. I ensured that all of the line weight were hair line. After that, I proceeded to print the design. On the print page, I had to check the material settings (power, speed, z-axis) which I didn't really get the opportunity to look into as I was panicking for time, and skipped onto the next step which was to move on to the Universal Control Panel (UCP). On the UCP, I activated the power button and then checked if the material I was going to cut fit on the right spot marked by the instructor. Once it was on the correct spot, I began the cutting process, which barely took 20 seconds to complete. After that, I removed the object from the laser cutter and switched off the necessary switches. With that I had completed my Laser cutter competency test!
The competency test was really fun and interesting to do as I managed to get hands on experience on how to operate a laser cutter. However, I do have to admit that the whole procedure of operating the laser cutter was tedious at first and it made me really nervous. I did make some slight mistakes here and there on where to find some buttons or which one I should press first. However, with the help of the Instructor, I managed to pull through and complete it. It was also assuring to know that the environment had a fire extinguisher nearby incase of any accidents. I am glad that I managed to learn this new skill and I am excited to laser cut more materials :)


Comments